
Low-light photos are some of the hardest images to rescue. A scene can feel dramatic in person, then look soft, grainy or muddy once you open the photo. Faces lose definition, product edges blend into the background and small details disappear into shadow.
AI can help make low-light photos clearer, but the best results come from using it in the right order. Sharpening a dark, noisy photo too aggressively can create crunchy edges or bright halos. Enhancing the wrong file can also exaggerate compression artifacts instead of restoring detail.
This guide walks through a practical workflow for improving low-light photos with AI, from choosing the best source image to reviewing the final result before you use it online.
Why low-light photos look blurry even when they are in focus
A low-light photo can look unclear for several reasons at once. That is why a simple sharpening slider often disappoints. It may sharpen the noise, but not the subject.
When there is not enough light, your camera or phone has to compensate. It may raise ISO, slow the shutter speed or apply heavy processing in the background. Each fix solves one problem while introducing another.
| Low-light issue | What it does to the photo | What AI may improve |
|---|---|---|
| High ISO noise | Adds grain and color speckles, especially in shadows | Can make edges look cleaner, depending on the file |
| Slow shutter speed | Creates motion blur from hand movement or moving subjects | Can improve mild softness, but not severe smear |
| Low contrast | Makes edges blend together | Can define borders and textures more clearly |
| Underexposure | Hides detail in dark areas | Can help after exposure is adjusted, if detail exists |
| Heavy compression | Breaks the image into blocky artifacts | Can improve appearance, but cannot restore missing data perfectly |
The key point is that “blurry” does not always mean the same thing. A photo of a candlelit dinner might be soft because the camera missed focus. A night street photo might be unclear because the shutter stayed open too long. A product photo taken indoors might have enough detail, but the low light made the edges look flat.
AI sharpening works best when some real detail is still present. If the image contains recognizable edges, texture or shapes, AI has something to enhance.
How AI helps make low-light photos clearer
Traditional sharpening usually increases contrast along edges. That can make a photo appear crisper, but it can also create halos, harsh outlines and visible grain. Low-light images are especially vulnerable because shadows already contain noise.
AI image sharpening takes a different approach. Instead of applying one global sharpening effect, it analyzes patterns in the image and tries to enhance the areas that look soft. This can help restore the appearance of hair texture, fabric weave, product outlines, signs, faces and other details that become muted in dim lighting.
If you want a deeper explanation of the technology behind this process, ImageSharpen has a separate guide on how AI image sharpening rebuilds detail in soft photos. For low-light images, the useful takeaway is simple: AI can often improve perceived clarity without requiring manual editing skills.
That said, AI is not a time machine. It cannot perfectly reconstruct a license plate hidden in black shadow or a face that was smeared by fast motion. It can enhance weak detail, but it cannot guarantee the recovery of information the camera never captured.
The best workflow for clearer low-light photos
The order of your edits matters. If you sharpen too early, you may lock in noise and artifacts. If you brighten too much before sharpening, the photo may look washed out. A balanced workflow gives AI the best input possible.
Start with the best available file
Use the original photo whenever you can. A downloaded social media version, screenshot or repeatedly shared image may already be compressed. Compression removes subtle detail, which limits what any AI tool can recover.
If you took several low-light shots of the same scene, compare them before enhancing. Look for the version with the least motion blur, the clearest subject and the most natural exposure. Do not only choose the brightest one. A darker photo with sharper edges often enhances better than a brighter photo with smeared motion.
Lightly adjust exposure before sharpening
If the image is extremely dark, use your phone or computer’s basic photo editor to make a gentle exposure adjustment first. Raise exposure or shadows just enough to see the subject more clearly. Avoid pushing the brightness so far that black areas turn gray or highlights lose detail.
This step is not about creating the final look. It is about giving the AI more visible structure to work with. If the photo already looks reasonably exposed, skip this step and sharpen first.
Upload the image to an AI sharpener
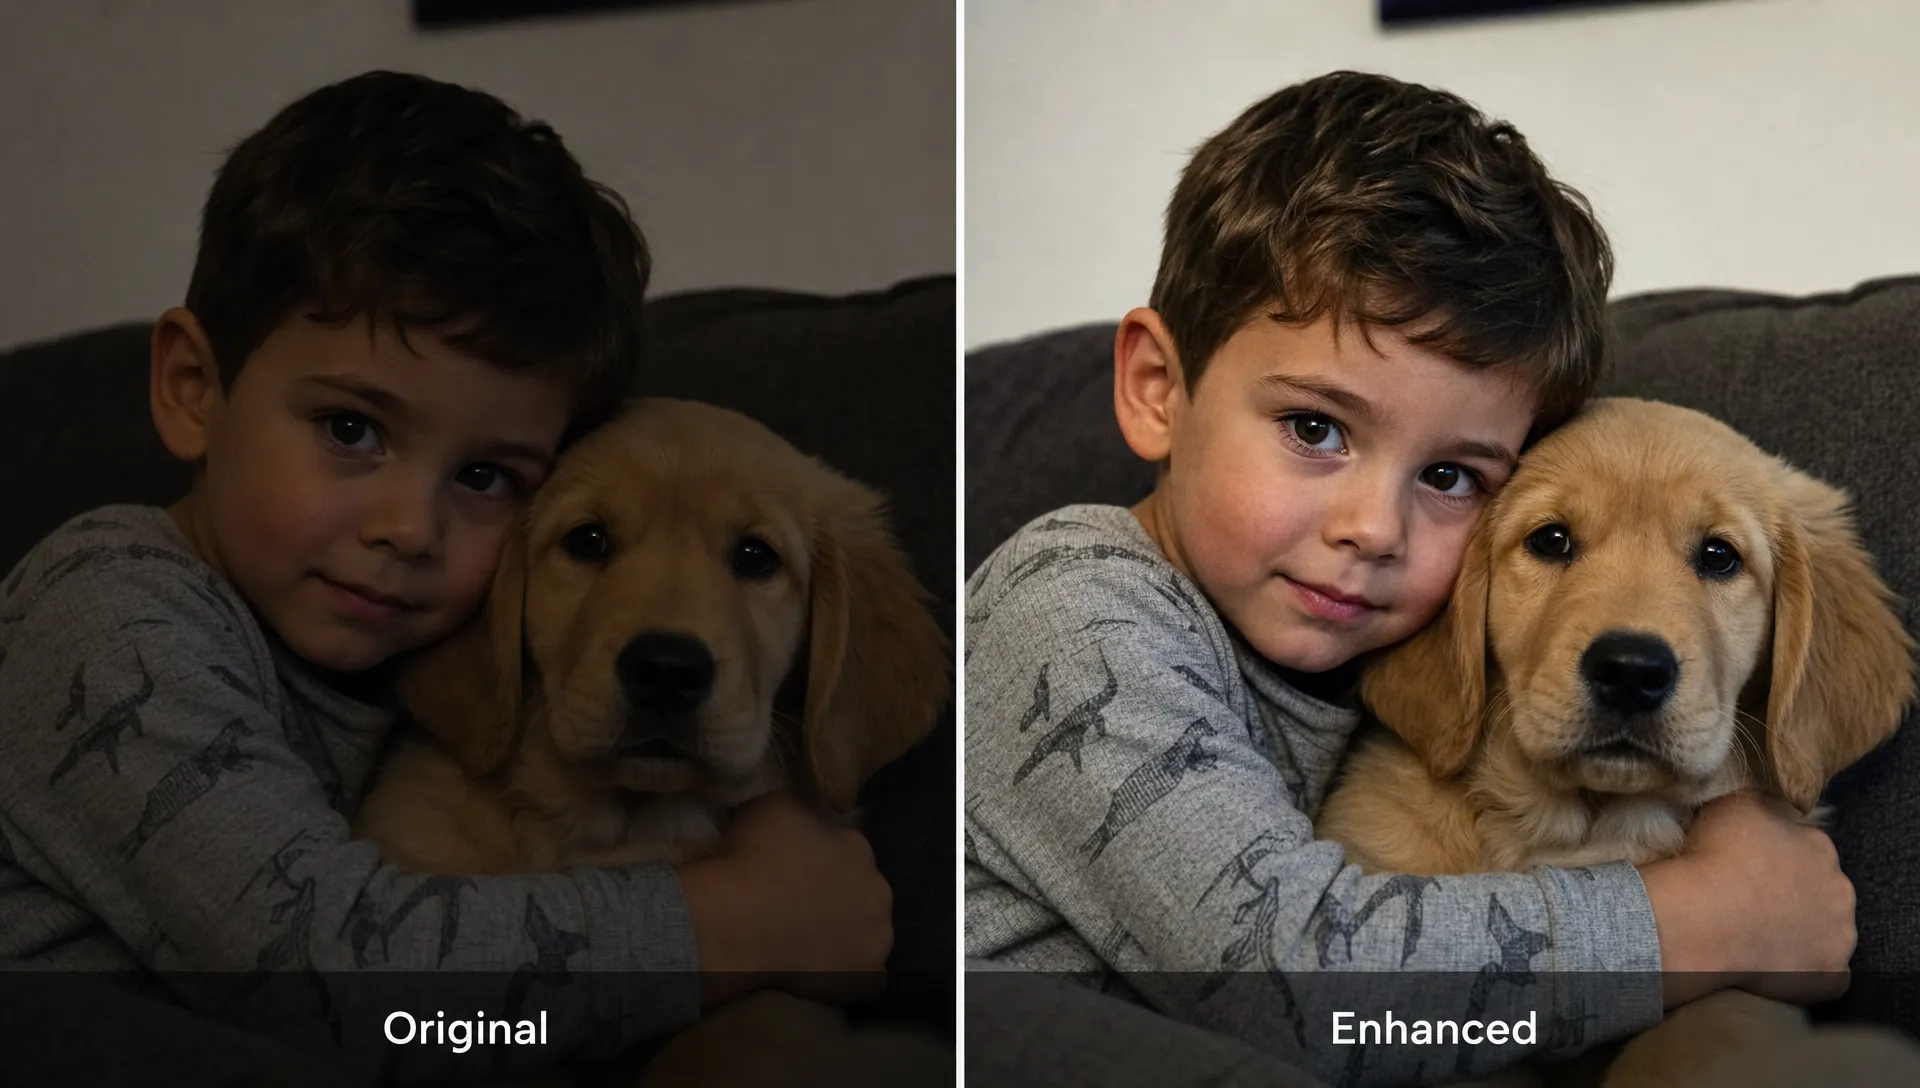
A browser-based tool is usually the fastest option if you do not want to install editing software. With ImageSharpen’s free AI image sharpener, you can upload a JPG, PNG or WEBP image, sharpen it online and preview the before-and-after result without creating an account. The tool supports files up to 20MB and can boost resolution up to 4x, which is useful when a low-light photo is also small or soft.
For many images, the process is straightforward: upload the file, let the AI process it, compare the result and download the clearer version. The tool is designed for fast browser use, including mobile browsers, so you can improve a low-light photo from your phone without switching to desktop software.
Review the result at the size you will actually use
A photo can look impressive when zoomed out, then overprocessed at 200 percent. The reverse can happen too: tiny imperfections visible at full zoom may not matter if the image will be used as a social post, marketplace listing or website thumbnail.
Check the enhanced version at the final display size. If you plan to print it, inspect it more closely. If you plan to upload it to a product page, focus on whether the product edges, texture and color look natural.
What to avoid when enhancing low-light photos
Low-light editing can go wrong quickly because darkness hides imperfections until you brighten or sharpen them. The goal is clarity, not maximum sharpness at all costs.
Avoid stacking multiple sharpening tools on the same image. One AI sharpening pass is often enough. Running the same file through several sharpeners can create hard outlines, plastic-looking skin or shimmering texture in shadows.
Be careful with screenshots and messaging app downloads. These files are often smaller than the original and may include compression artifacts. AI can still improve them in some cases, but expectations should be lower.
Do not judge the image only by the subject’s eyes or the sharpest edge. Look across the whole frame. Low-light enhancement should make the main subject clearer without making the background noisy or unnatural.
For commercial images, add one more step: human review. This matters for ecommerce photos, ads, thumbnails and brand content because an overprocessed image can hurt trust. A similar principle applies in broader AI production workflows. Archer Scaling AI explains where human review still matters in AI marketing workflows, especially when automated output affects quality, client trust or final publishing decisions.
Which low-light photos improve the most with AI?
AI sharpening is most useful when the image is slightly soft, underlit or low resolution but still recognizable. A portrait taken indoors, a food photo from a restaurant, a dim product image or a night travel photo can often look much clearer after enhancement.
Low-light product photos are a common example. If the object is in focus but the image looks flat because the room was dim, AI can often define edges and surface texture more clearly. If you are improving images for a store, you may also find this guide on making a product photo clearer without a reshoot useful.
Photos with mild camera shake may also improve. AI can sharpen the appearance of edges when the blur is limited. The results are usually better when the subject did not move too much and the original file has enough resolution.
Small images can benefit from AI upscaling as well. Low-light photos often come from phones, social apps or older cameras, so increasing resolution while sharpening can make the image more usable for web uploads, presentations or personal archives.
When AI cannot fully fix a low-light photo
Some low-light photos are simply too damaged. If the subject is hidden in near-black shadow, there may be no real detail to reveal. Brightening the image may only expose noise.
Severe motion blur is another common limit. If a person turned their head during the shot or the camera moved while the shutter was open, facial details may be stretched across multiple pixels. AI may make the outline cleaner, but it cannot reliably recreate the exact original expression.
The same applies to tiny subjects. If the person, text or product occupies only a small part of the frame, cropping heavily before sharpening reduces the available data. In those cases, try enhancing the full image first, then crop after downloading the improved version.
For a realistic look at these limits, see ImageSharpen’s explanation of why AI cannot clear every blurry image. Knowing the limits helps you avoid wasting time on files that need a reshoot, a better source image or a different editing approach.
Quick checklist before you download the final image
Before saving the enhanced version, take a minute to compare it against the original. A clearer image should still look believable.
- Check faces for natural skin texture, not waxy smoothing
- Check dark backgrounds for noisy speckles or strange patterns
- Check text, signs and product labels for legibility
- Check edges for bright halos or over-sharpened outlines
- Check color after enhancement, especially in warm indoor lighting
- Check the image at its intended size, not only at maximum zoom
If the enhanced photo looks too intense, go back to the original and adjust the workflow. Sometimes the best fix is a lighter exposure adjustment before sharpening. Other times, the original should be sharpened directly with no brightness change.
Practical examples of low-light photos you can improve
A dim family photo from a restaurant may become more usable when the AI sharpens faces and clothing edges. It may not remove every grainy shadow, but it can make the memory look less muddy.
A night street photo can improve if buildings, signs and pavement texture are present but soft. The enhanced version may look better for sharing or saving, especially if the original was taken on a phone in automatic mode.
An indoor product photo can become clearer when the product edges, packaging and material texture are slightly blurred by weak lighting. AI enhancement can help make the item look more presentable without a full reshoot, provided the original photo is not severely out of focus.
A dark document or receipt photo may become easier to read if the text is soft but still visible. If the text is completely obscured by shadow or motion, AI may improve contrast but not recover every character.
Frequently Asked Questions
Can AI make any low-light photo clear? No. AI can improve many soft, dim or low-resolution photos, but it cannot perfectly restore details that were never captured. Extremely dark images, severe motion blur and heavily compressed files have limited recovery potential.
Should I brighten a low-light photo before using AI sharpening? If the photo is very dark, a small exposure or shadow adjustment can help. Keep it gentle. Over-brightening can reveal noise and make the final sharpened image look harsh.
Does AI sharpening remove noise from low-light photos? AI sharpening mainly improves clarity and edge definition. Some tools may make noise less distracting, but sharpening can also make grain more visible if the source file is very noisy.
What file type works best for low-light enhancement? Use the highest-quality original you have. JPG, PNG and WEBP files can be sharpened with ImageSharpen, but an original camera file or full-size phone photo usually gives better results than a screenshot or compressed social media download.
Can I improve low-light photos on my phone? Yes. A browser-based AI sharpener can work directly from a mobile browser, so you can upload, preview and download an enhanced image without installing an app.
Make your low-light photos clearer online
If your low-light photo still has visible detail, AI can often make it sharper, cleaner and more usable in seconds. Start with the best source file, avoid heavy edits before sharpening and compare the result carefully before downloading.
You can try it free with ImageSharpen. Upload your photo, preview the before-and-after result and download a clearer version without signing up or installing software.