
AI image enhancement has become impressively good at making soft photos look cleaner. A slightly out-of-focus product shot can gain crisper edges. A compressed social media image can look less mushy. A low-resolution picture can often be enlarged and sharpened enough for a website, listing or personal archive.
But AI is not magic. It cannot always clear a blurry image because blur often removes information from the file before the software ever sees it. When the camera fails to capture detail, an enhancer can estimate what should be there, but it cannot guarantee that the estimate is true.
That distinction matters. If you are improving a family photo, a product listing or a screenshot, a realistic enhancement may be enough. If you need to read a license plate, identify a face or recover tiny text for legal evidence, AI sharpening has hard limits.
What AI image sharpening actually does
An AI sharpener analyzes patterns in an image and tries to make edges, textures and contrast look more defined. Traditional sharpening tools increase local contrast around edges, which can help a soft image but can also create halos or grain. Modern AI tools go further by using trained models to recognize common visual patterns such as hair, fabric, product edges, letters and facial features.
That is why AI can often make a blurry photo look more usable than a basic editor can. It can reduce the muddy look caused by compression, improve perceived clarity and upscale an image so it has more pixels to work with. ImageSharpen, for example, is built for quick browser-based sharpening, unblurring and resolution boosting without requiring a sign-up or software install.
Still, the output depends heavily on the input. The AI is not going back in time to refocus the lens or freeze motion. It is making the best possible improvement from the pixels available.
This is connected to a basic principle in digital imaging: if fine detail was never sampled clearly enough, it cannot be reconstructed with certainty. The Nyquist-Shannon sampling theorem explains this idea in signal processing terms. In plain English, once the original detail is missing or mixed beyond recognition, software can only infer, not recover.
Why some blurry images can be improved
AI works best when the image still contains useful visual clues. If the blur is mild, the model can detect where edges should be sharper. If the photo was compressed by a messaging app, the AI may be able to clean up blocky or smeared areas. If the image is low-resolution but structurally clear, upscaling can make it look better at a larger size.
Common examples that often improve include slightly soft portraits, web product photos, small images intended for online use, scanned documents with readable text and screenshots that became fuzzy after resizing. These are not guaranteed fixes, but they give the AI something to work with.
If your goal is practical rather than forensic, this is often enough. A product image may not need to reveal microscopic fabric texture. It just needs to look clear, trustworthy and presentable. A screenshot may not need to be perfect. It only needs readable labels and sharper interface elements.
For images with visible detail, you can follow a simple workflow to make a blurry photo clear and compare the before and after result before deciding whether the file is usable.
Why AI cannot clear every blurry image
The biggest limitation is that blur is not one problem. It can come from focus error, motion, low light, camera shake, compression, low resolution, dirty lenses or a combination of several issues. Each type damages the image differently.
A photo that is slightly out of focus may still have enough structure to sharpen. A photo taken during fast motion may smear details across many pixels. A heavily compressed image may replace real texture with blocky artifacts. A tiny image enlarged too many times may contain so little data that there is no reliable detail left to enhance.
AI can make educated guesses, but those guesses can become misleading. A face may look sharper but not exactly like the real person. A sign may look more legible but contain letters the AI inferred from nearby shapes. A product edge may appear cleaner while fine engraving or small print remains inaccurate.
| Blur problem | What AI can usually improve | Where the limit appears |
|---|---|---|
| Mild focus blur | Edge contrast, perceived sharpness and texture | Very fine detail may remain soft |
| Light camera shake | Some outlines and object boundaries | Strong directional smearing is hard to reverse |
| Low resolution | Larger output with cleaner structure | Missing details cannot be verified |
| Compression artifacts | Blockiness, mushy texture and rough edges | Heavily damaged areas may look artificial |
| Motion blur | Overall clarity if movement is slight | Fast movement can blend details beyond recovery |
| Blown highlights | Surrounding contrast and edges | Pure white areas have no recoverable detail |
| Deep shadows | Some contrast if data remains | Black crushed areas may only reveal noise |
A good AI tool can improve many of these files visually. It cannot promise factual restoration when the original file no longer contains enough signal.
The difference between real detail and plausible detail
This is the part many people miss. AI enhancement can create detail that looks believable. That is useful for aesthetics, but it can be risky when accuracy matters.
Imagine a blurry photo of a street sign. If the original letters are only partly visible, AI may sharpen the strokes and make the text seem clearer. In some cases, that helps. In others, the output may look like a confident answer even though the underlying pixels were ambiguous.
The same applies to faces, license plates, serial numbers, receipts and medical or legal images. Enhanced output should not be treated as proof unless the original data supports it. For serious identification or evidence, preserve the original file and avoid relying on a single AI-enhanced version.
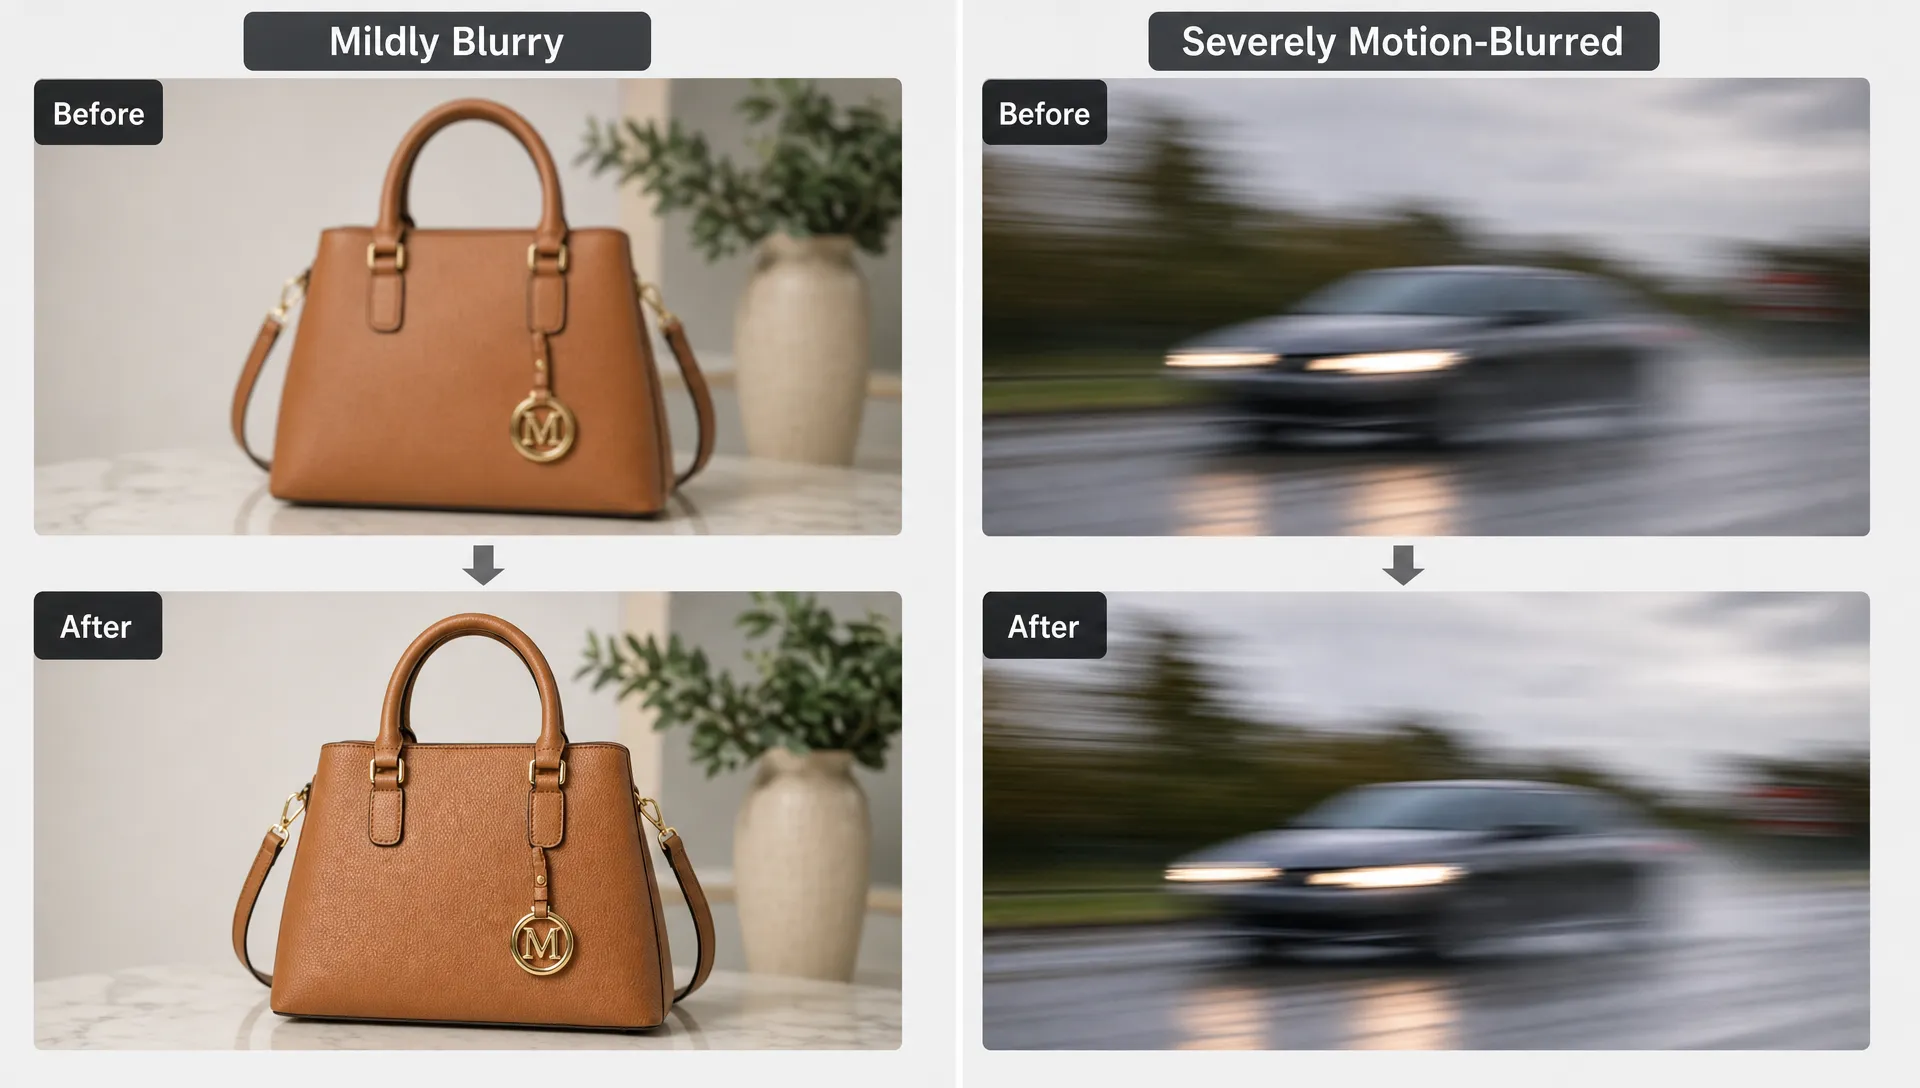
For everyday use, plausible detail is often acceptable. Sharper clothing texture in a portrait, cleaner edges in a logo preview or a less fuzzy product image can all be valuable. The key is knowing when you are improving presentation and when you are trying to recover facts.
The types of blur AI struggles with most
Severe motion blur is one of the hardest cases. When a subject moves during exposure, the camera records a smear instead of a crisp shape. If the motion path is long, many details are blended together. AI can sometimes reduce the smear, but it may not know where the original edges truly were.
Large focus errors are also difficult. If the camera focused on the background while the subject is far out of focus, the subject may not contain enough defined edges for reliable restoration. The result may look smoother and sharper at first glance but still fail close inspection.
Tiny images are another challenge. If a photo is 120 pixels wide and the subject occupies only a small part of the frame, there is simply not much information. Upscaling can make the file larger, but it cannot reveal exact eyelashes, product labels or small text that never existed in the pixel data.
Heavy compression can be just as damaging. Messaging apps and social platforms often reduce file size by discarding visual information. This can create blocky edges, smeared skin, noisy backgrounds and distorted text. AI can improve the look, but it may struggle if the compressed version is the only copy left. If your image came from a chat app, this guide on how to fix blurry WhatsApp photos explains why the original file matters.
How to improve your chances before using AI
The best way to get a better AI result is to start with the best available version of the image. A sharpener can only work with what you upload, so small choices before enhancement can make a visible difference.
Use the original file when possible instead of a screenshot, forwarded image or downloaded preview. Avoid editing the photo several times before sharpening because each export can add compression. If you have multiple versions, choose the largest one with the least visible damage. Uploading a JPG, PNG or WEBP directly from the source usually gives better results than using a copy saved through several apps.
It also helps to be realistic about cropping. If you crop tightly before enhancing, you may remove context the AI could use. In many cases, sharpening first and cropping later gives a cleaner result. For screenshots, start with the highest-resolution capture you can, especially if the text is small. If that is your specific issue, the steps to sharpen a blurry screenshot are slightly different from fixing a normal camera photo.
A simple pre-check can save time:
- Zoom to 100 percent and see whether important details are faintly visible.
- Look for clipped areas that are pure white or pure black.
- Check whether motion has smeared the subject across several pixels.
- Find the original image rather than a resized or forwarded copy.
- Enhance once, compare the preview and avoid repeated sharpening passes.
Repeated sharpening is a common mistake. Running the same image through multiple tools can make edges crunchy, skin plastic and text distorted. A clean single pass is usually better than forcing clarity that is not there.
When you should reshoot instead of trying again
AI sharpening is worth trying when the image is important and a better original is not available. It is fast, low effort and often enough for everyday use. But there are times when reshooting is the better decision.
If the image is for a product page and the label is unreadable, a reshoot will usually outperform any tool. If a portrait has a severely missed focus point, AI may make it more shareable but not print-quality. If a document photo has tiny blurred text, rescanning or taking a new photo in better light is the safest path.
What a realistic AI result looks like
A realistic expectation is not perfect restoration. It is improvement. A good result may look cleaner, sharper and more usable, while still having some softness in the hardest areas. The background may improve less than the subject. Tiny text may remain unreadable. Faces may look clearer without being suitable for identification.
That is why a before and after preview matters. It lets you judge whether the output solves your actual problem instead of relying on a generic promise to clear blurry image files in every situation.
If the enhanced result helps your audience see the subject, read the main text or trust the visual quality, it has done its job. If you need exact recovery of missing details, no AI tool can honestly guarantee that.
Frequently Asked Questions
Why does an AI-enhanced image sometimes look fake? This can happen when the model fills in missing texture or edges based on patterns rather than real image data. The result may be visually sharper but not fully accurate.
What kind of blurry image is easiest to fix? Mild blur, slight softness, light compression and low-resolution images with visible structure are usually the best candidates for AI sharpening.
Can AI read blurry text in a photo? Yes, if the text is only mildly blurred and the letter shapes are still visible. If the text is too small, smeared or heavily compressed, AI may guess incorrectly.
Try improving your image with realistic expectations
AI cannot clear every blurry image, but it can often turn a soft or low-quality file into something more useful. If your photo still contains visible detail, it is worth testing before you reshoot or give up on the image.
With ImageSharpen, you can upload a JPG, PNG or WEBP in your browser, sharpen and enhance it with AI, preview the before and after result and download the improved version. It is free to use, works without sign-up and supports uploads up to 20MB.